Зміст
To integrate Outscraper with Make.com, connect the Outscraper Google Maps Search API to Make.com’s HTTP module, add your Outscraper API key through the X-API-KEY header, then use an Iterator to send each business record into Google Sheets as a separate row.
This workflow is useful when manual Google Maps lead research is too slow, and CSV exports are creating extra cleanup work. Instead of copying business names, addresses, websites, and phone numbers manually, you can build a simple lead flow that moves fresh Google Maps business data from Outscraper into spreadsheets your sales team can use.
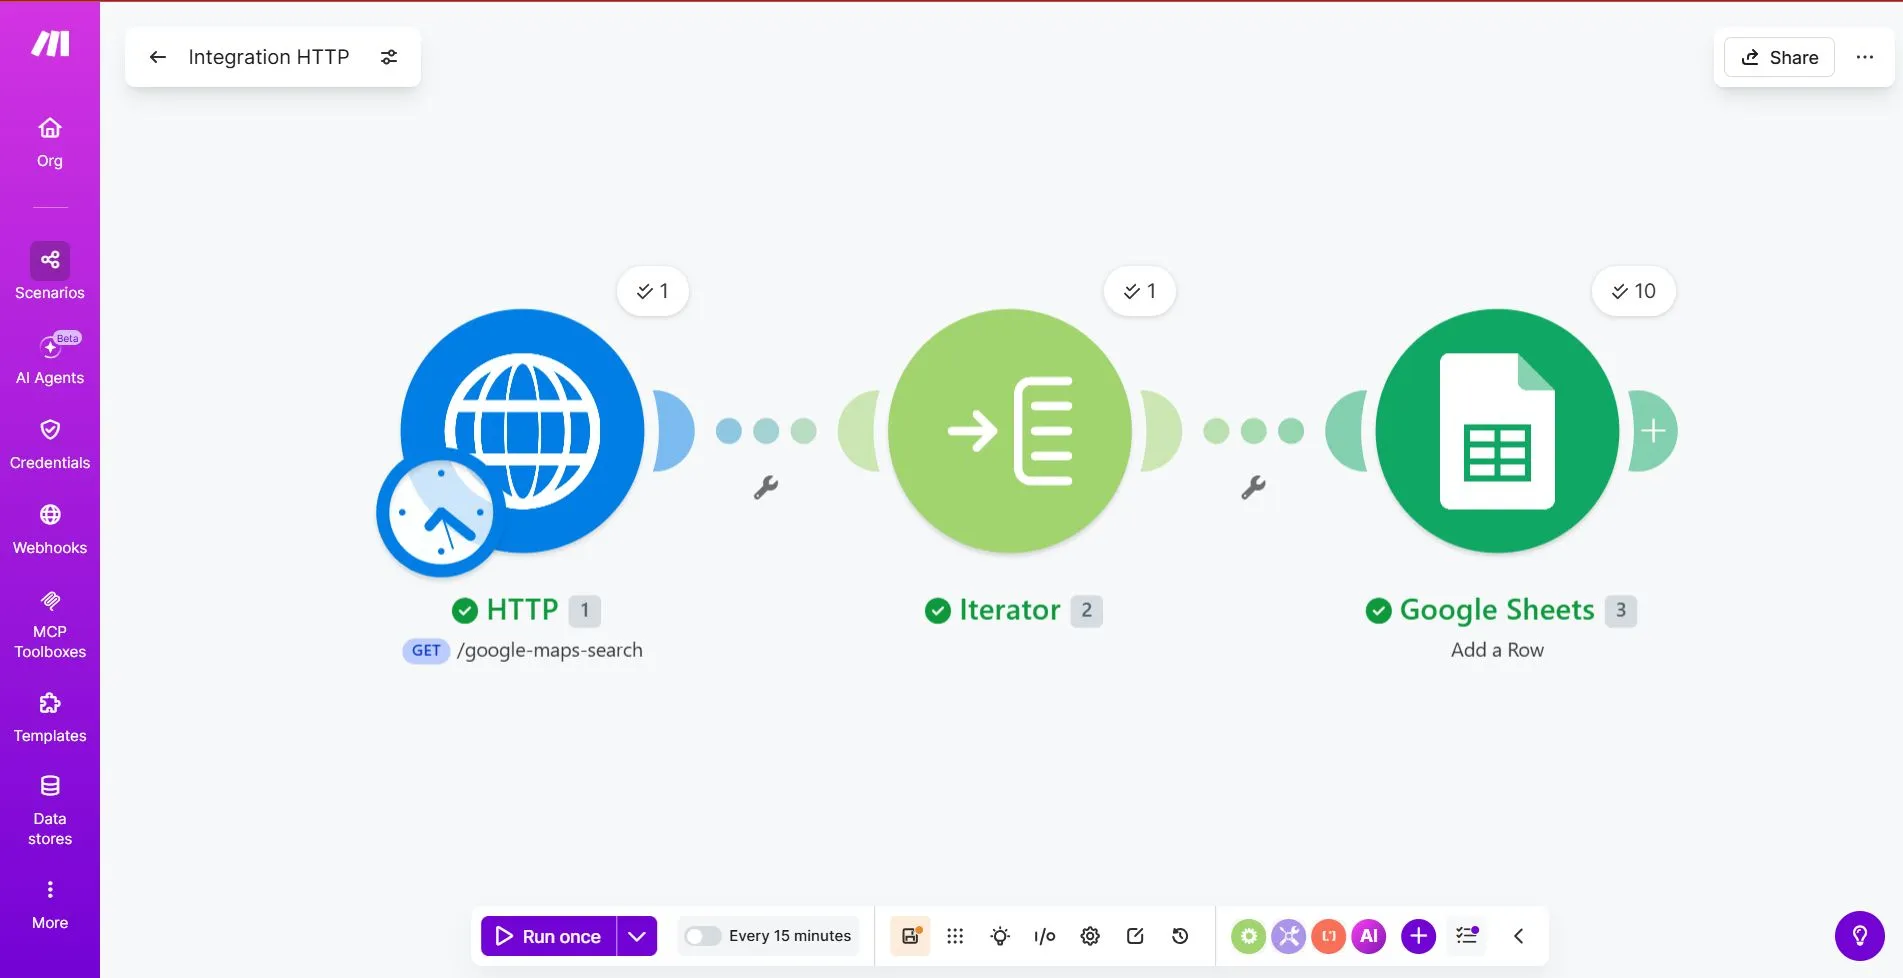
A common mistake is stopping after the HTTP request. Outscraper can return multiple Google Maps businesses in one API response, but Google Sheets needs one business per row. That is why this beginner workflow uses three steps: request the data with HTTP, unpack the results with Iterator, and store each business in Google Sheets.

The 3-Step Lead Flow Framework
1. Request the data
Make.com sends a Google Maps search query to Outscraper through the HTTP module.
2. Unpack the results
Outscraper can return several businesses in one API response. The Iterator module separates those results so Make.com can process one business at a time.
3. Store each business
Google Sheets receives each business as a new row.
This framework keeps the tutorial focused on the most important part of the integration: moving business data into a usable lead list.
Important setup note: The HTTP module connects Make.com to Outscraper, but the Iterator is what makes the data usable in Google Sheets. Without the Iterator, your workflow may receive the API response but fail to create clean rows for each business.
Before You Start
Before building the Make.com scenario, prepare your Outscraper API key and a simple Google Sheet. This makes the setup easier to test because you only need to check four fields at first.
If you are new to Outscraper, start with the Google Maps Scraper before building the Make.com workflow.
You will need:
1. An Outscraper account. Зареєструватися if you don’t have one.
2. A Make.com account
You will use Make.com to build the automation scenario. For this beginner workflow, you need three modules:
- HTTP
- Iterator
- Google Sheets

3. A Google Sheet for your leads
Create a Google Sheet with these columns:
- Business Name
- Адреса
- Веб-сайт
- Phone Number
4. A sample search query
Start with a specific local search query before running a larger scrape.
Examples:
restaurants in Miami, FL, US
dentists in Austin, TX, US
commercial cleaning companies in London, UK
HVAC contractors in Dallas, TX, US
For your first test, use a small limit such as 10 results. This gives you enough data to check the workflow without making the request too large.
Once the basic setup works, you can increase the limit and add more fields later, such as rating, reviews, category, source query, lead status, or date added.

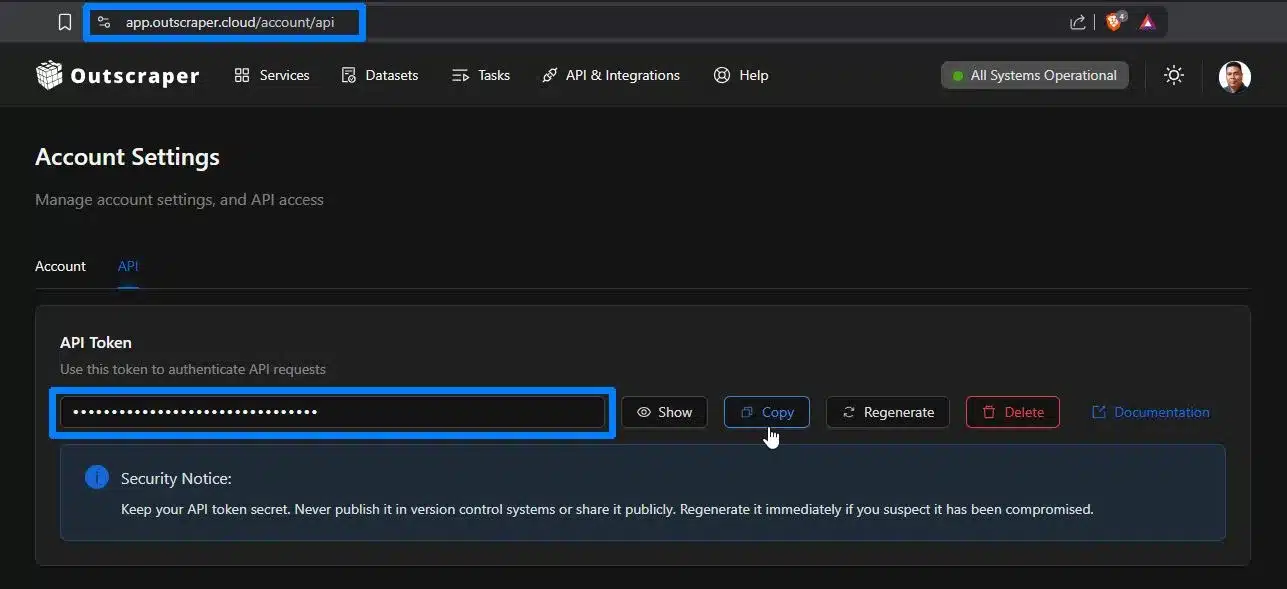
You will need an Outscraper account and API key before connecting the Google Maps Search API to Make.com. Start free, copy your API key, then follow the steps below.
Step 1: Connect Make.com to Outscraper
The first step is to create a Make.com scenario that can send a request to Outscraper.
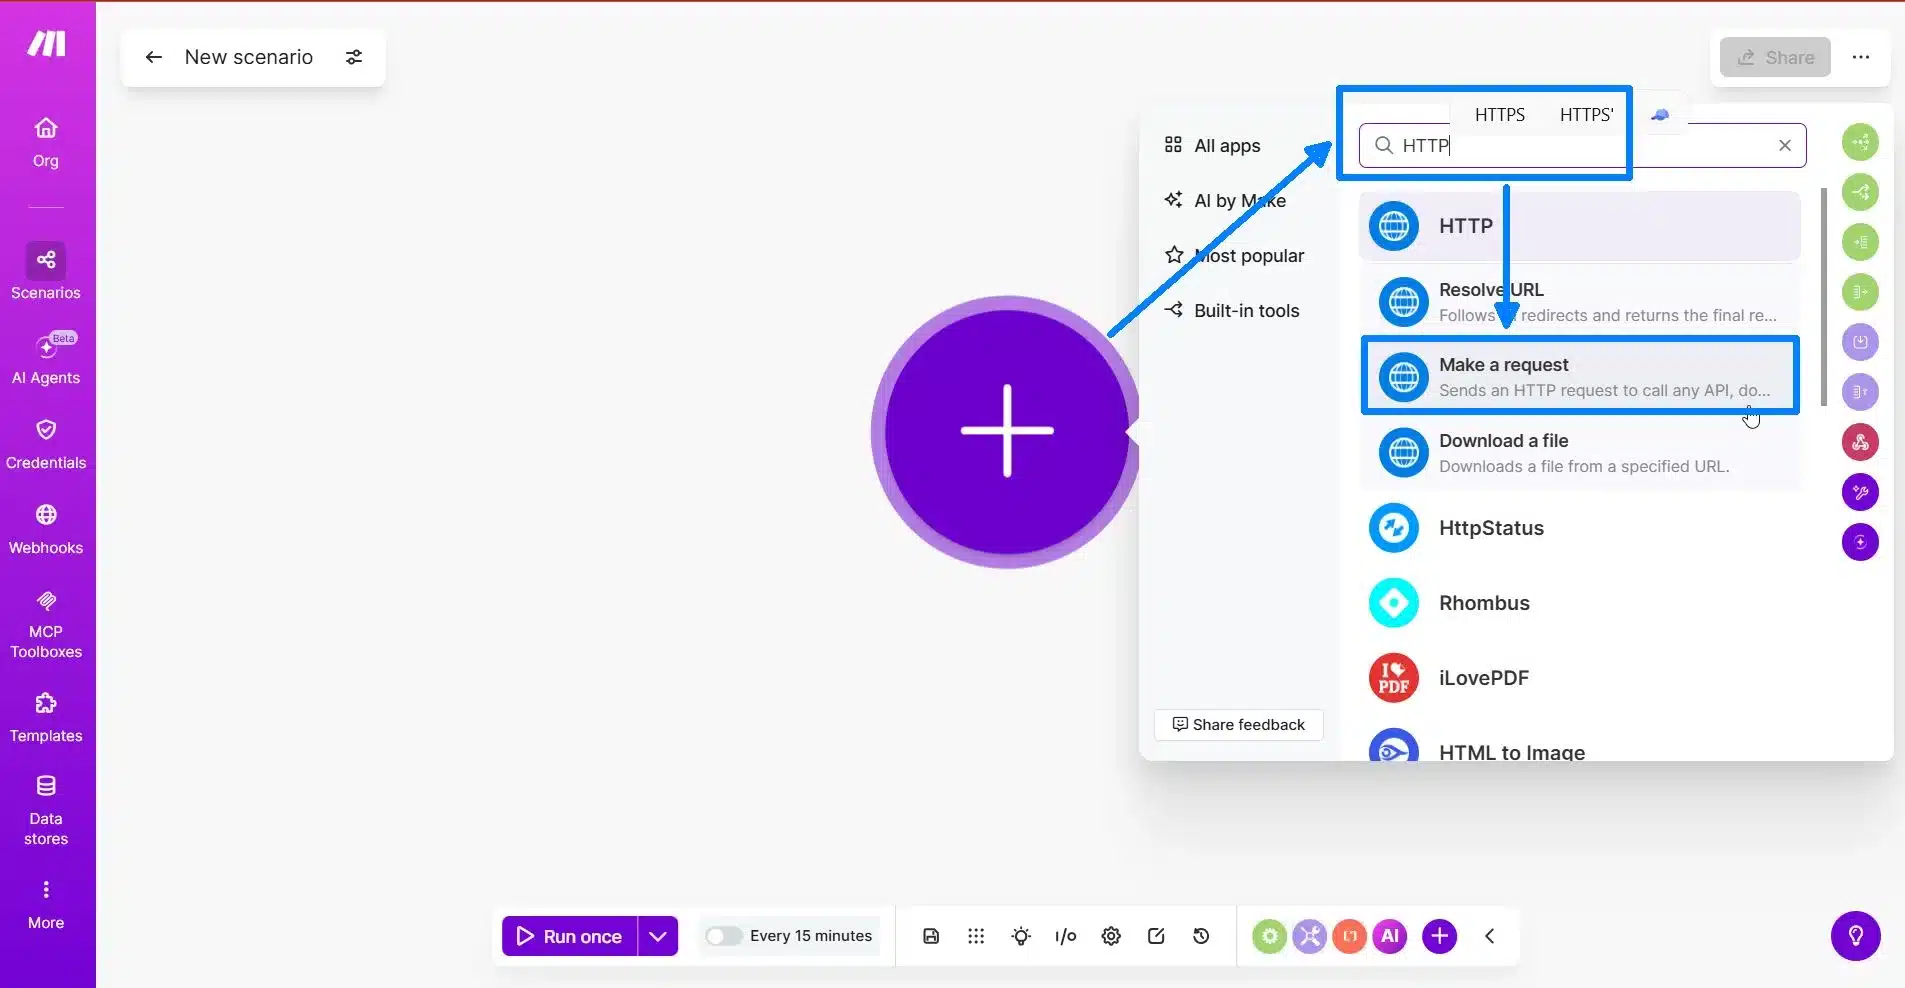
Log in to Make.com and create a new scenario. Click the plus button to add your first module.
Search for HTTP and choose Make a request.
This HTTP module will connect Make.com to the Outscraper API. It is the part of the workflow that sends your Google Maps search query to Outscraper.
Configure the HTTP Module
Inside the HTTP module, fill out the request settings from top to bottom.
Use these settings:
| Setting | Value |
|---|---|
| Authentication | No authentication |
| Method | GET |
| URL | https://api.outscraper.cloud/google-maps-search |
Ви можете перевірити official Outscraper API documentation for the latest endpoint, authentication, and parameter details.
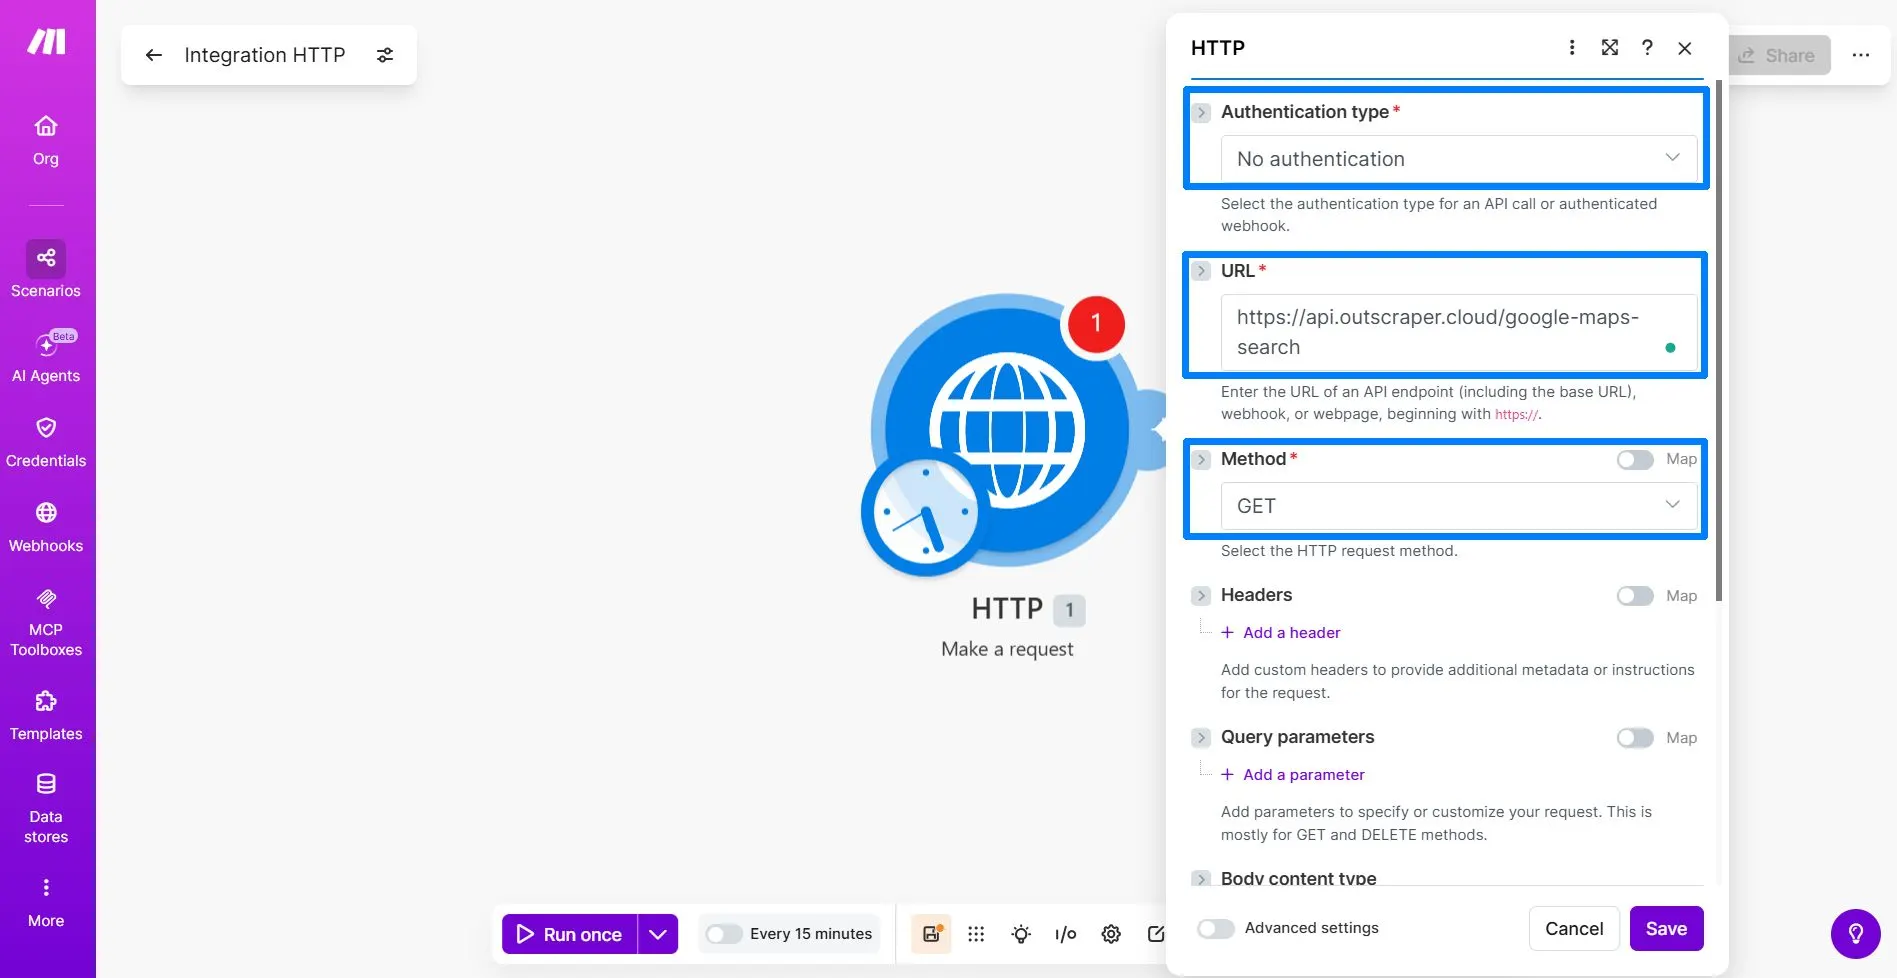
Choose No Authentication because you will add your Outscraper API key manually in the Headers section.
The GET method tells Make.com to request data from the Outscraper API.
The URL tells Make.com which Outscraper endpoint to call. For this tutorial, use the Google Maps Search endpoint.
https://api.outscraper.cloud/google-maps-search
Add the API Key Header
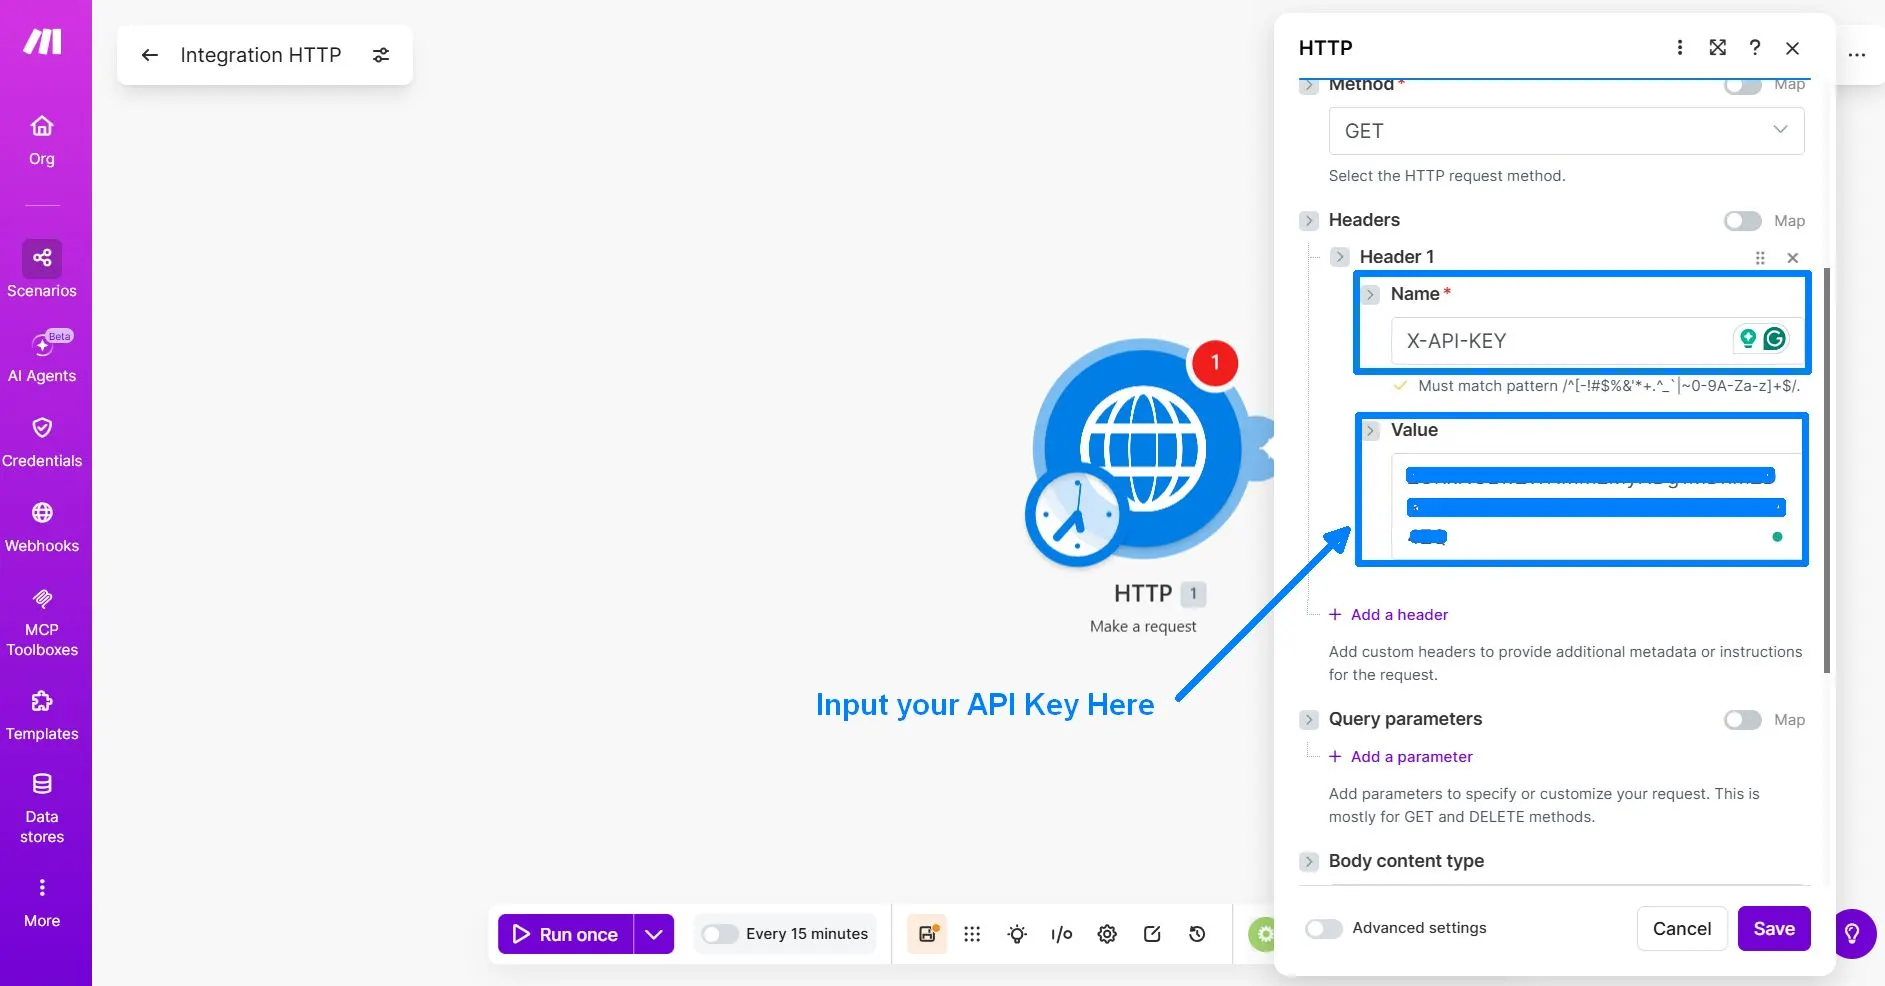
Click Add a header. This lets you add a custom header that sends your Outscraper API key with the request.
Use this header:
| Header Name | Header Value |
|---|---|
X-API-KEY | Your Outscraper API key |
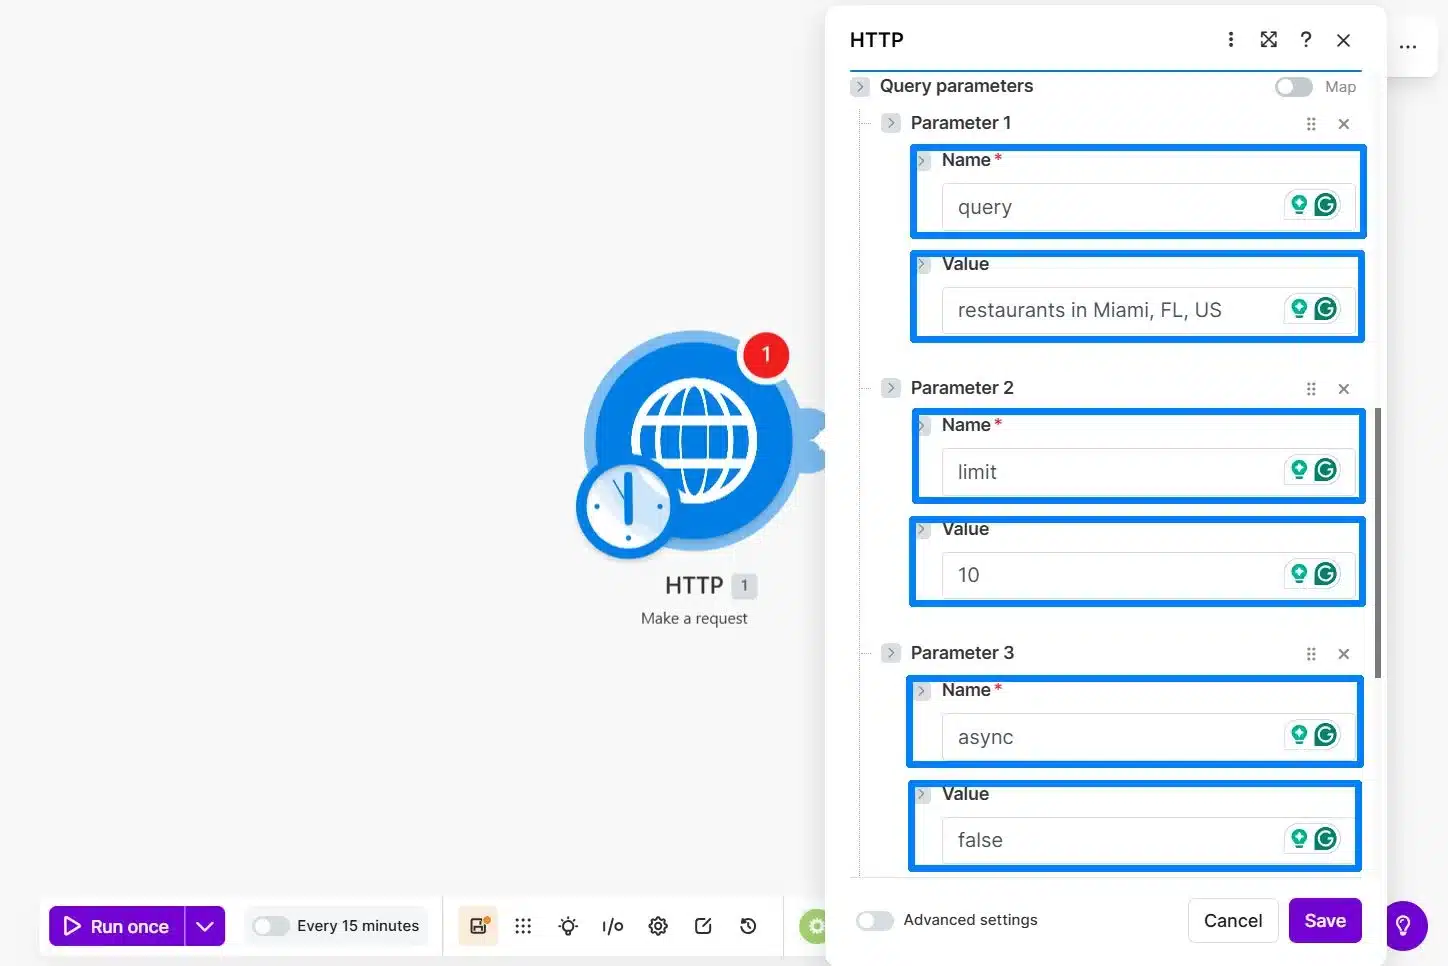
Add the Query Parameters
After adding the API key header, add the query parameters for your first test request. These parameters tell Outscraper what to search, how many results to return, and how the request should run.
For this beginner workflow, keep the request small and simple. Use one local search query, return only 10 results, and leave advanced field filtering for later.
Use these parameters:
| Parameter | Value | Purpose |
|---|---|---|
query | restaurants in Miami, FL, US | Tells Outscraper what to search on Google Maps. |
limit | 10 | Controls how many businesses to return for the first test run. |
async | false | Returns the results in the same Make.com scenario run. |
На сьогоднішній день, на жаль, це не так. query parameter tells Outscraper what to search on Google Maps.
На сьогоднішній день, на жаль, це не так. limit parameter controls how many businesses to return for the first test.
На сьогоднішній день, на жаль, це не так. async=false parameter keeps the workflow easier to test because Make.com waits for the results in the same scenario run.
You may see many fields in the response, such as about, rating, reviews, working_hours, and other business details. This is normal. You do not need to use every field. Later, when you add the Google Sheets module, you will only map the fields needed for your sheet:
namefull_addresssitephone
Optional note for advanced users:
Outscraper also supports a fields parameter if you want to limit the response to specific fields. For this beginner tutorial, it is easier to leave it out first and choose the fields during the Google Sheets mapping step.
Final HTTP Module Settings Before Running
Before you click Run once, review a few final settings in the HTTP module. These options help Make.com receive and read the Outscraper response correctly.
Use these settings:
| Option | Recommended Setting | Simple Explanation |
|---|---|---|
| Body content type | Leave empty | This is a GET request, so you do not need to send a request body. |
| Parse response | Yes | This helps Make.com read the JSON response and show the fields you need later. |
| Pagination type | Leave empty or none | This beginner test uses limit=10, so pagination is not needed. |
| Timeout | 300 seconds | This gives Outscraper more time to return the results if the request takes longer. |
For the first test, keep the request small. Use limit=10 and confirm that Make.com can receive the business name, address, website, and phone number before increasing the volume.
Run the First Test and Check the Response
After reviewing the final HTTP module settings, click Run once in Make.com.
Make.com will send your request to Outscraper using the API endpoint, X-API-KEY header, and query parameters you added earlier.
If the setup is correct, the HTTP module should show a green check mark and return a response from Outscraper. Open the HTTP module output and check the result.
A successful first test should show Status Code: 200. This means Make.com successfully received a response from the Outscraper API.
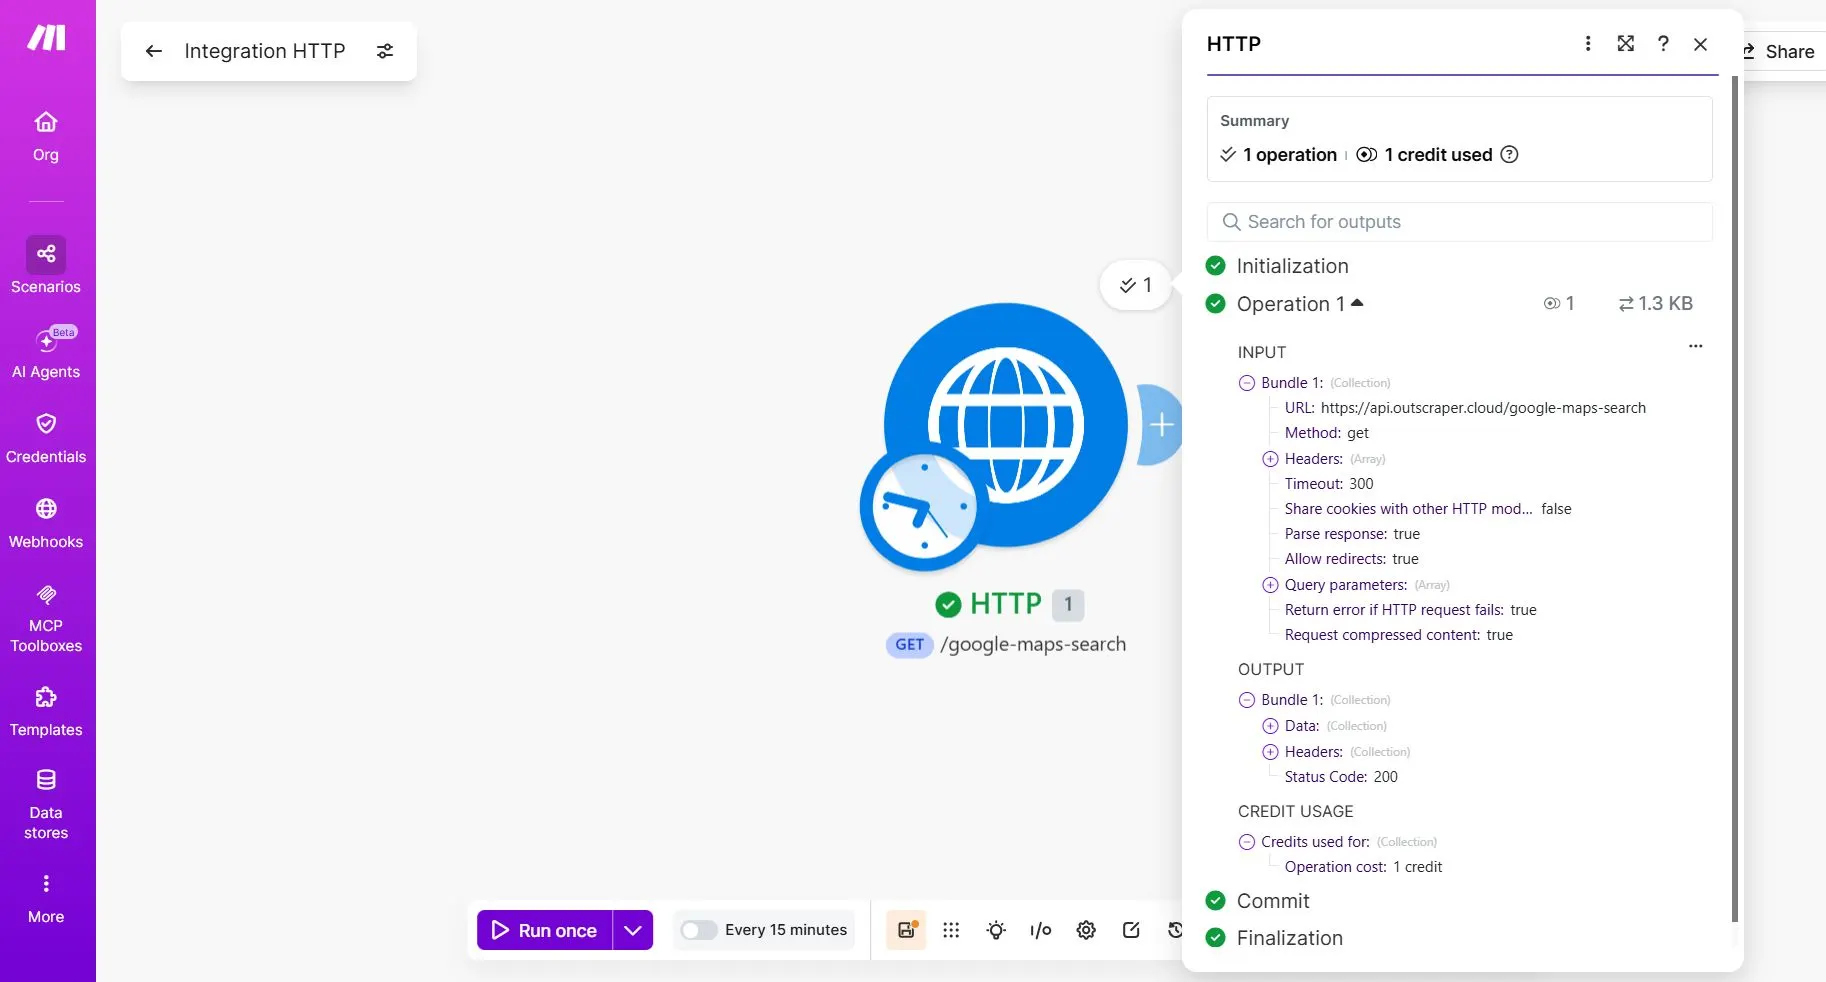
What a Successful Test Means
The first test is successful if the HTTP module runs without an error and returns a valid response from Outscraper.
Use this quick checklist:
| What to Check | What It Means |
|---|---|
| Green check mark on the HTTP module | The HTTP module ran successfully. |
Status Code: 200 | Make.com successfully received a response from the Outscraper API. |
Parse response: true | Make.com can read the JSON response and use the returned fields in the next modules. |
| Data section is available | The Outscraper response contains returned data that you can expand and inspect. |
name, address або full_address,
website або siteі phone | These are the fields you will map later into Google Sheets. |
After confirming the request is successful, expand the Data section in the HTTP module output.
Look for these fields:
nameaddressабоfull_addresssiteабоwebsitephone
Make.com may display some field labels differently from the raw Outscraper API response. Choose the field based on the data it contains.
| Google Sheets Column | Outscraper Field |
|---|---|
| Business Name | name |
| Адреса | full_address |
| Веб-сайт | site |
| Phone Number | phone |
You may also see the results inside a data array. This is normal. Outscraper can return several businesses in one response, so the next step is to use an Iterator to separate those businesses into individual records.
At this stage, do not connect Google Sheets yet. The goal is only to confirm that Make.com can receive business data from Outscraper.
Once you can see the business records in the HTTP output, the API connection is working. The next step is to unpack the response so Make.com can process each business as a separate row.
Before building the Iterator step, make sure your Outscraper request is returning real business records.
Step 2: Split Outscraper Results with an Iterator
After the HTTP module returns a successful response, add an Iterator. This step separates the Outscraper results so Make.com can process one business at a time.
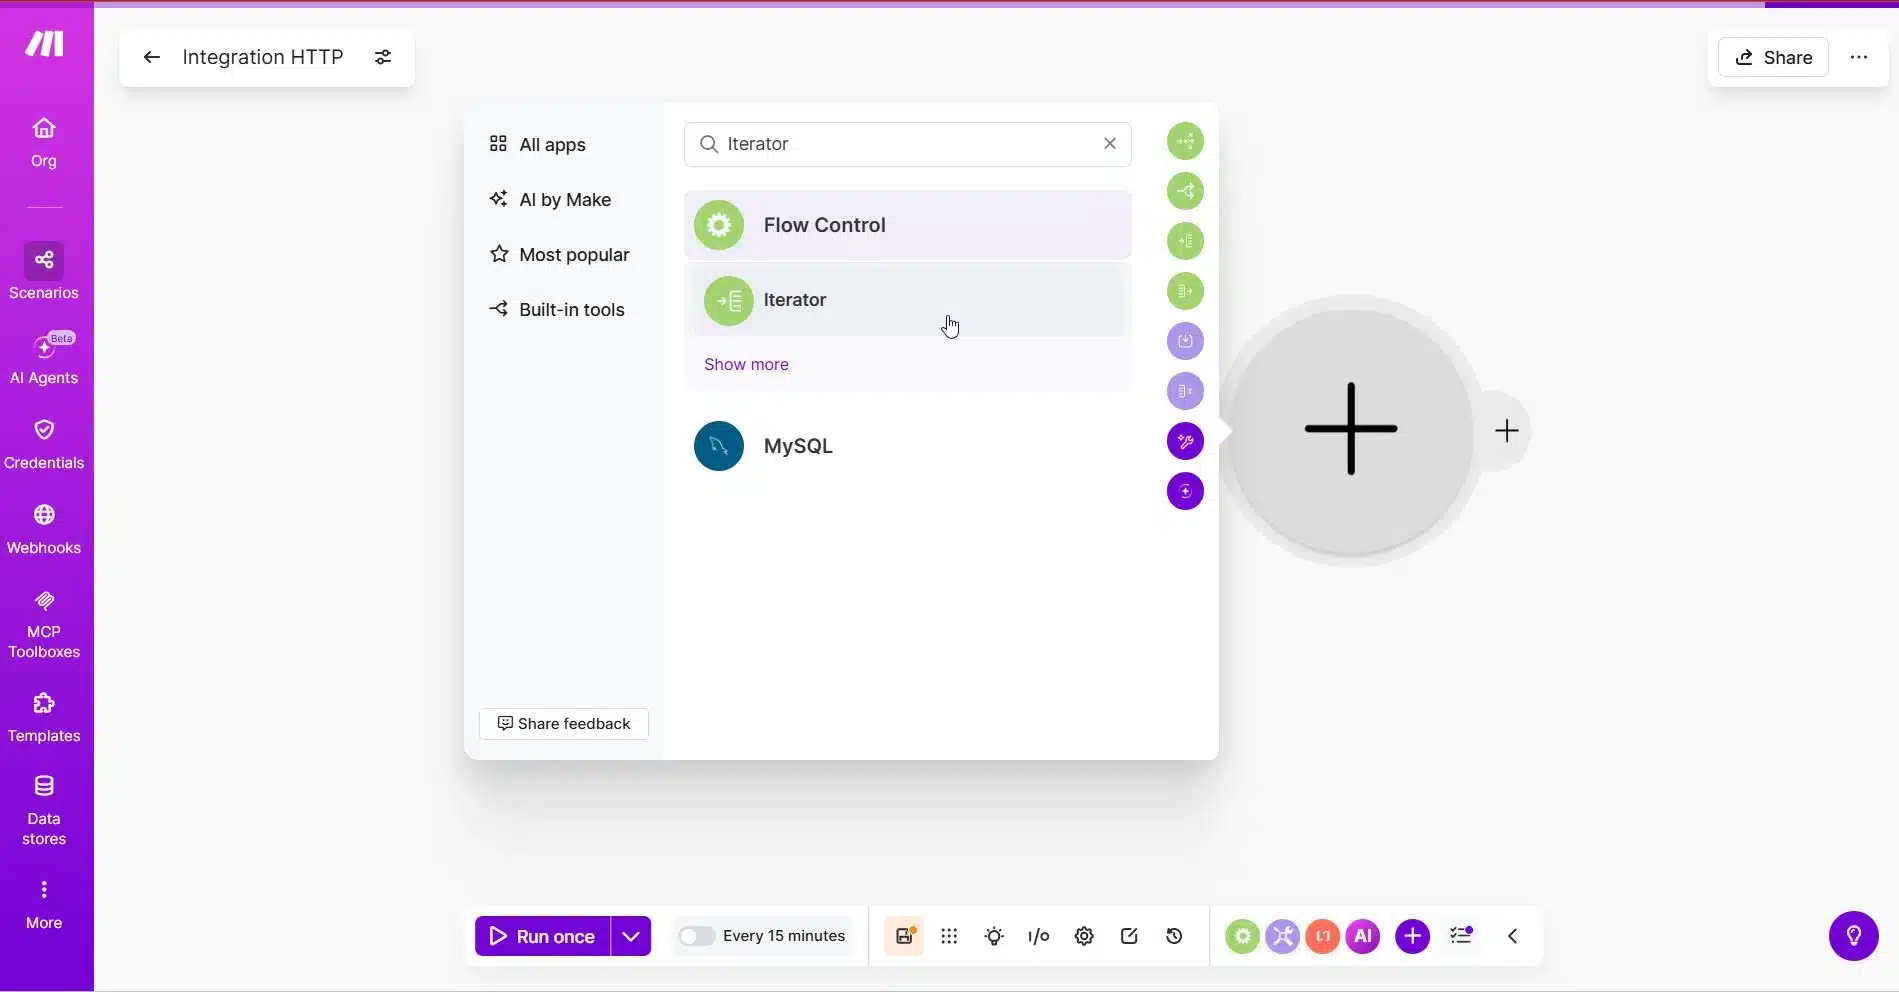
Add the Iterator Module
In Make.com, click the plus button after the HTTP module.
Search for Iterator and select it.
The Iterator should be placed immediately after the HTTP module.
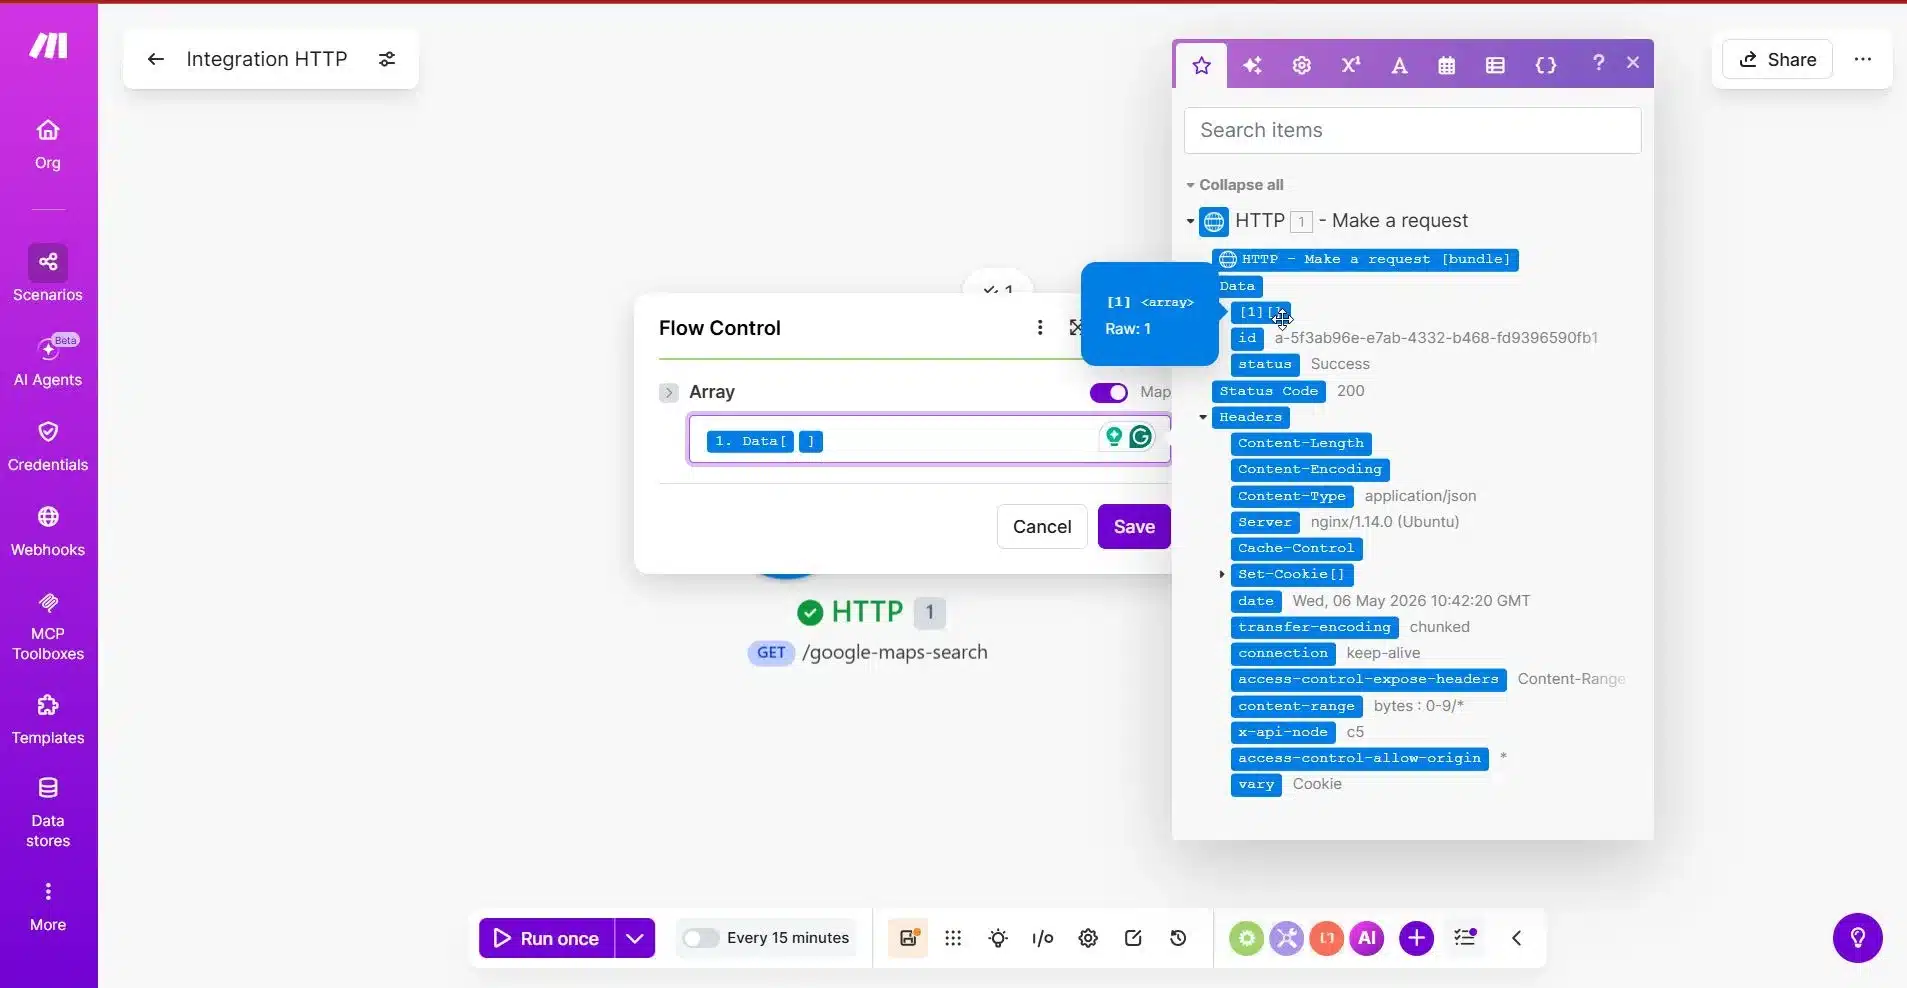
Choose the Array
Inside the Iterator module, Make.com will ask for the Array.
This is the most important part.
Select the array from the HTTP module that contains the business results.
For Outscraper, the results may appear inside a nested structure like:
Data -> 1
Because Outscraper can return results inside a nested data array, you may need to expand the HTTP module output and choose the inner array that contains the actual businesses.
The correct array is the one that contains multiple business records.
Run the Iterator Test
After choosing the array, click Run once again.
If your request used:
limit = 10
then the Iterator should create up to 10 bundles.
Each bundle should represent one business.
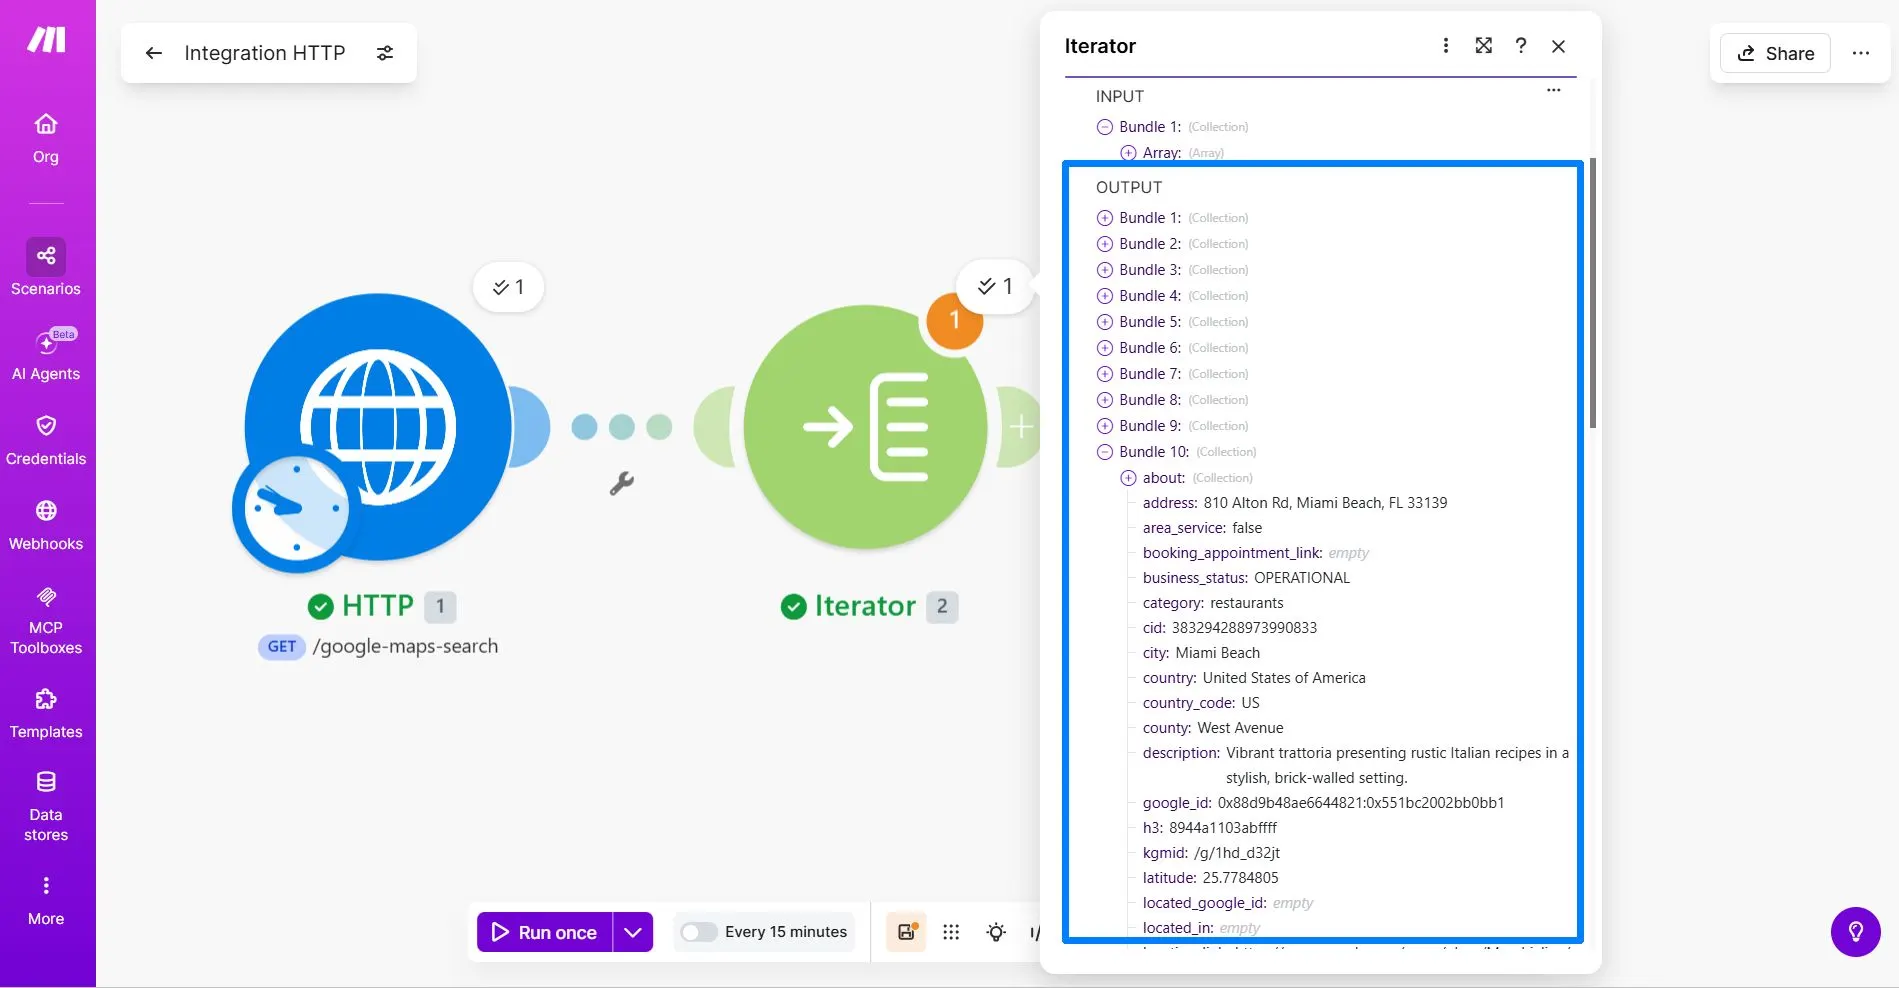
Check One Iterator Bundle
After the Iterator test runs, click the Iterator output bubble and open one bundle.
Check if the bundle contains business details such as:
nameaddressабоfull_addresssiteабоwebsitephone
You may also see many other fields, such as about, rating, reviewsабо working_hours. This is normal. For this beginner workflow, focus only on the fields you will use in Google Sheets.
| Google Sheets Column | Outscraper Field |
|---|---|
| Business Name | name |
| Адреса | address або full_address |
| Веб-сайт | website або site |
| Phone Number | phone |
If the Iterator creates multiple bundles and each bundle contains one business, the setup is working.
What If the Iterator Only Creates One Bundle?
If the Iterator only creates one bundle, you probably selected the wrong array.
Go back to the Iterator module and check the Array field again. Choose the inner array inside Data that contains the actual business records.
The correct array should create several bundles, not just one.
Since your test uses limit = 10, seeing up to 10 bundles means Make.com is correctly separating the Outscraper results.
Once the Iterator is working, the next step is to send each bundle into Google Sheets as a new row.
Once the Iterator separates the results, send clean business records into Google Sheets, your CRM, or another sales workflow. Start small, then scale when the rows look accurate.
Step 3: Send Each Business to Google Sheets
After the Iterator creates separate bundles, the next step is to send each business record into Google Sheets.
Each Iterator bundle represents one business. When you add the Google Sheets module after the Iterator, Make.com will use each bundle to create one new row in your spreadsheet.
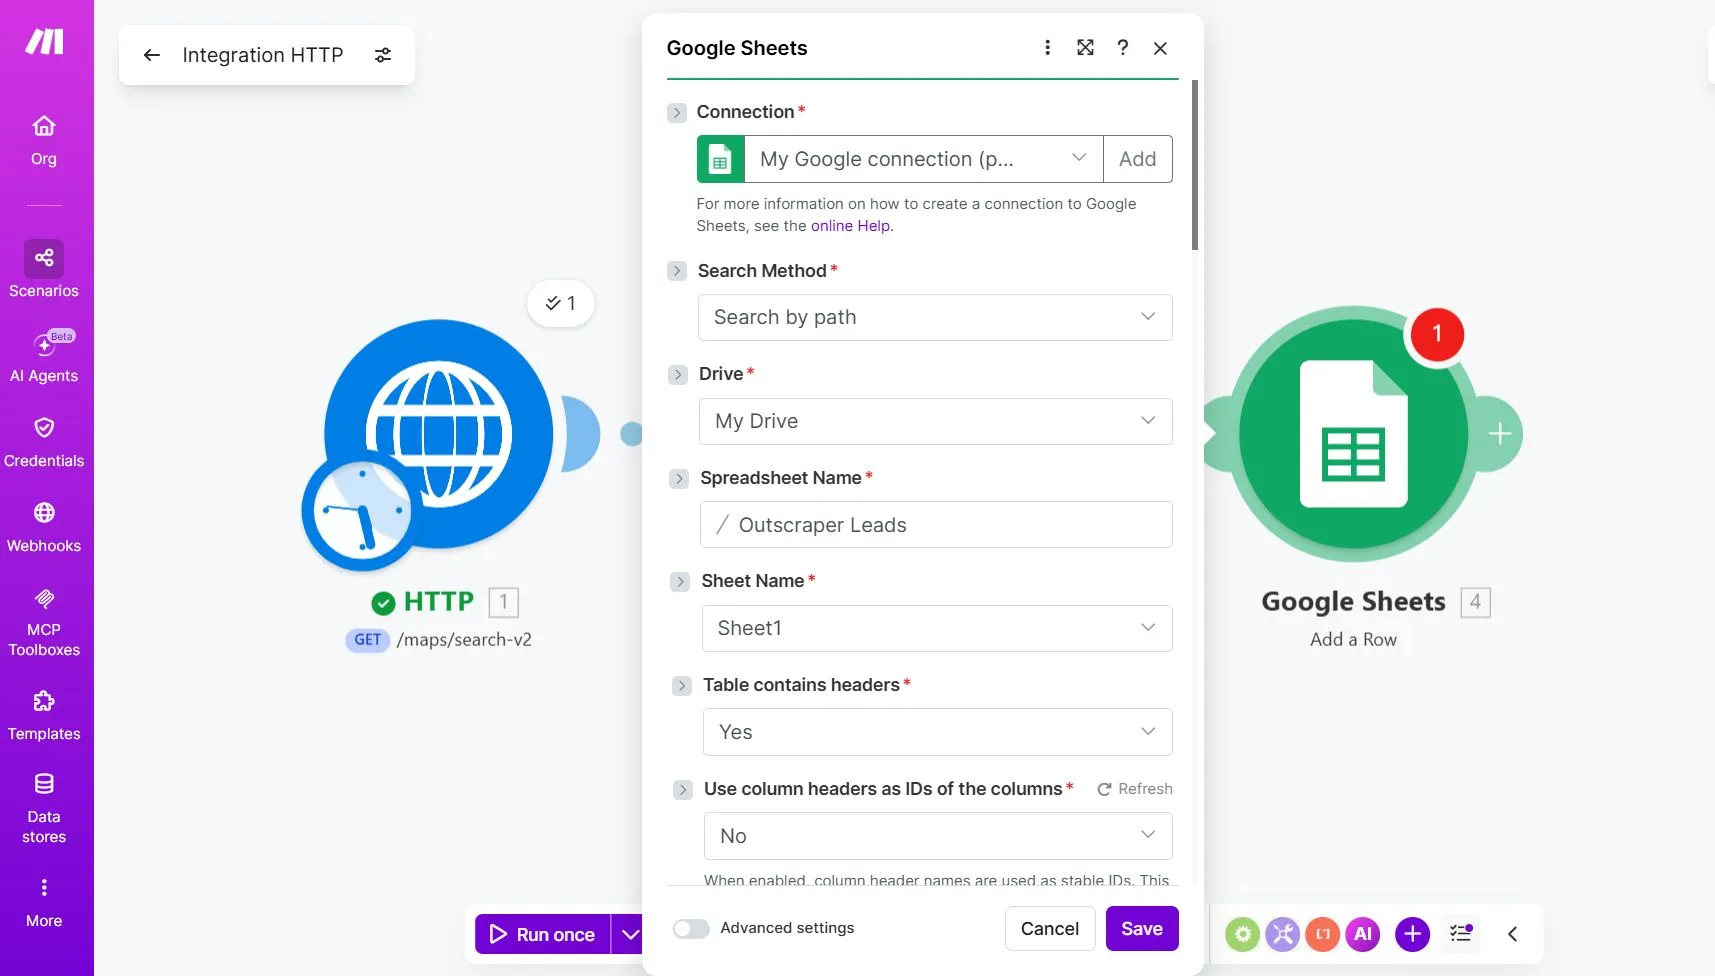
Add the Google Sheets Module
Click the plus button after the Iterator module.
Search for Google Sheets and choose Add a Row.
This module will add each business from the Iterator into your Google Sheet.

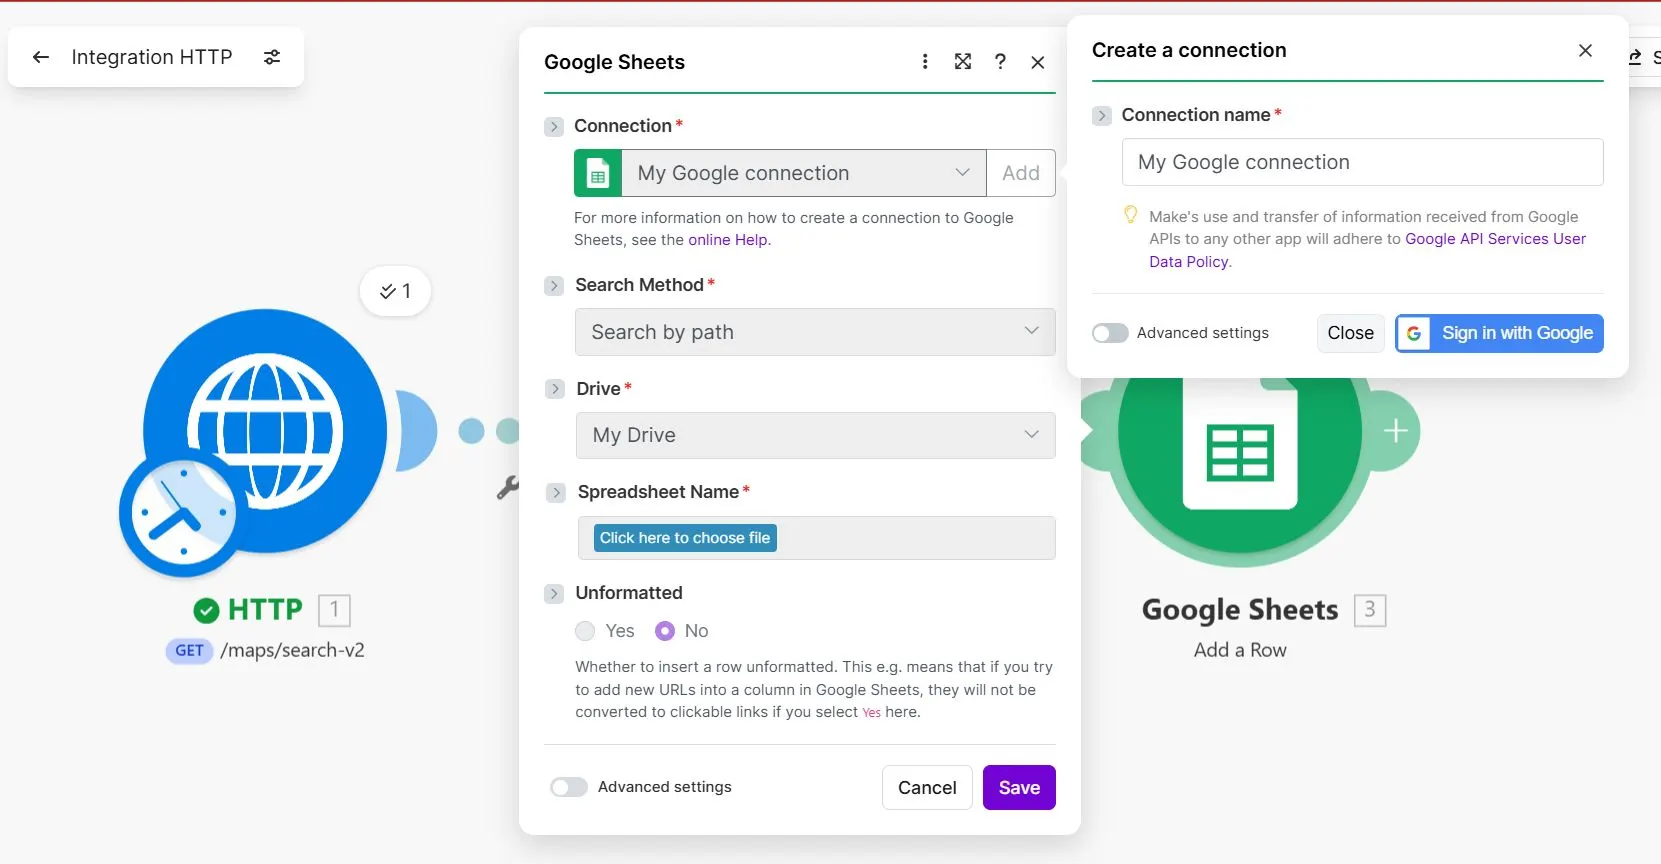
Connect Your Google Account with Make.com
If this is your first time using Google Sheets in Make.com, connect your Google account.
After connecting, choose the spreadsheet where you want to store your Outscraper leads.
Then choose the worksheet or tab that contains your lead columns.
Before connecting Make.com to your Google account, make sure you have prepared the spreadsheet where your leads will be saved. For this tutorial, your Google Sheet should have these columns:
- Business Name
- Адреса
- Веб-сайт
- Phone Number
Map the Iterator Fields to Google Sheets
In the Google Sheets module, map each Google Sheets column to the matching field from the Iterator output.
In Make.com, the field names may appear slightly differently from the raw Outscraper API response. For example, the address field may appear as address замість full_address, and the website field may appear as website замість site.
Use the fields that match the data you see in your Iterator output.
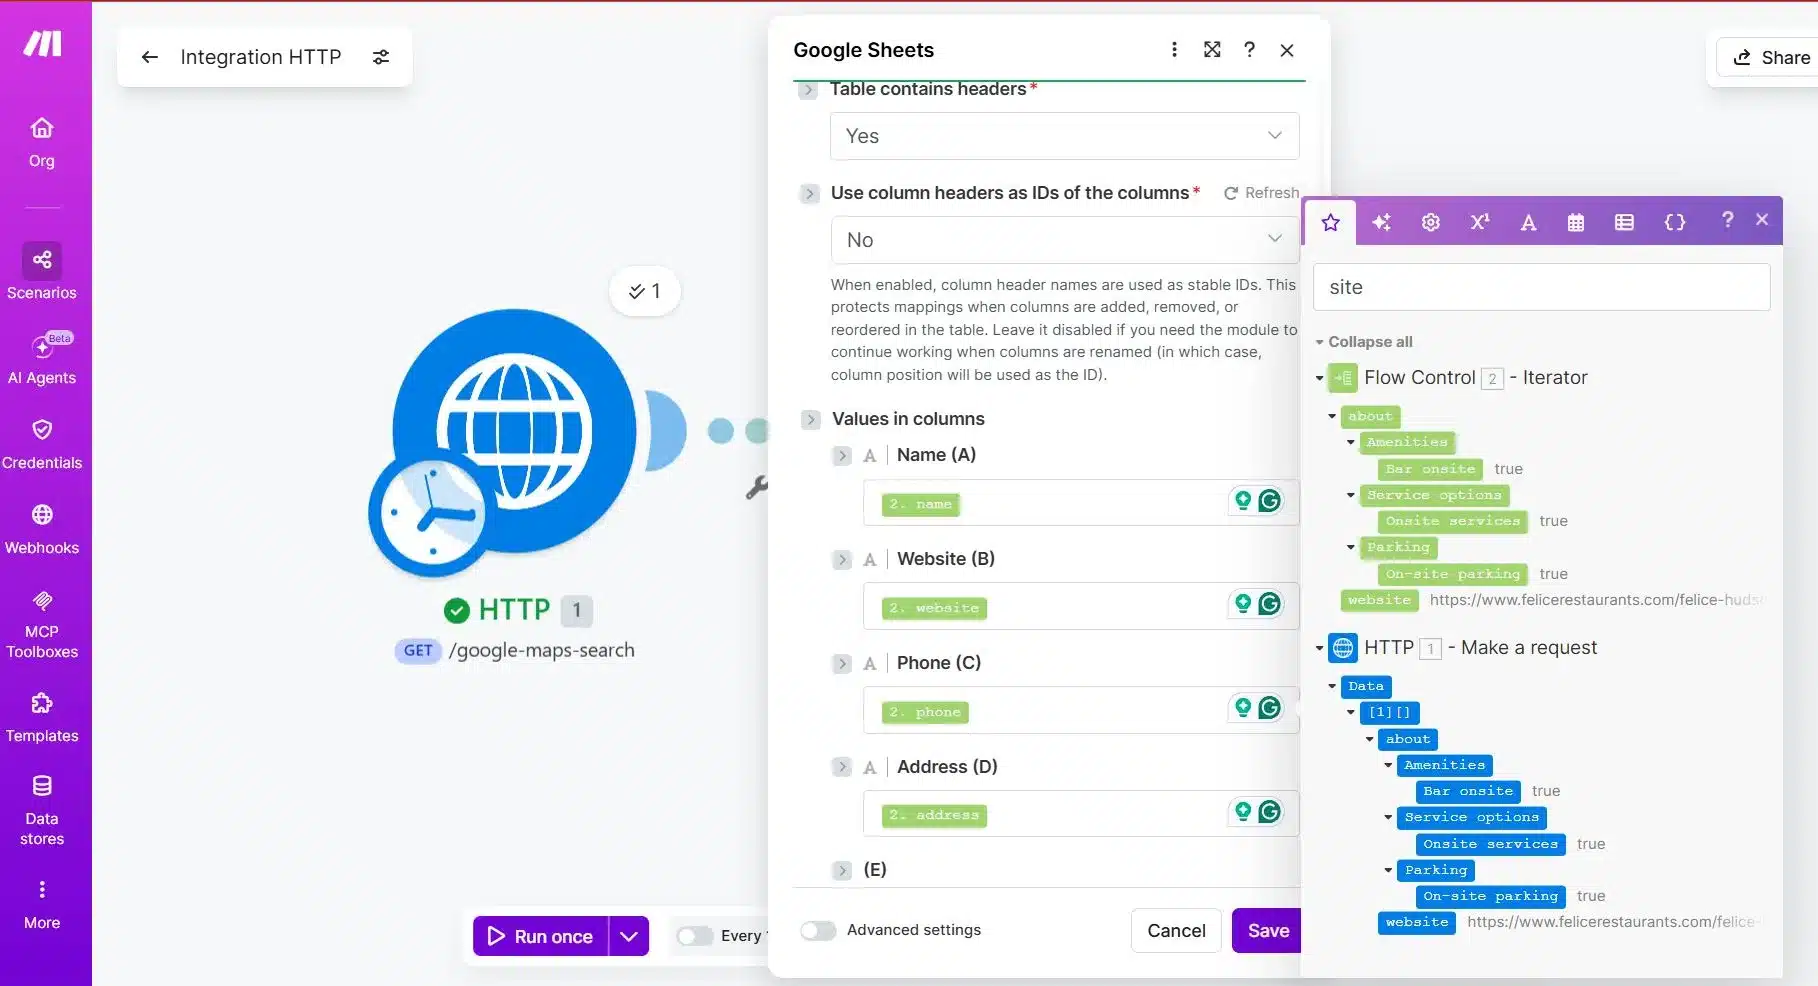
| Google Sheets Column | Iterator Field |
|---|---|
| Business Name | name |
| Адреса | address |
| Веб-сайт | website |
| Phone Number | phone |
Mapping note:
The field labels in Make.com may not always match the raw Outscraper API field names exactly. For example, you may see address замість full_addressабо website замість site. Choose the field based on the data it contains, not only the label.
Make sure you select the fields from the Iterator module, not directly from the HTTP module. The Iterator is what separates each business record, so the Google Sheets module should use the Iterator output.
Run a Test for Outscraper and Make.com Integration
Click Run once again.
If the setup is correct, Make.com should add up to 10 rows to your Google Sheet because your test request uses limit = 10.
Check the spreadsheet and confirm that:
- Each business appears on a separate row
- Business names are in the Business Name column
- Addresses are in the Address column
- Websites are in the Website column
- Phone numbers are in the Phone Number column
If each bundle becomes one row, your Outscraper to Google Sheets workflow is working. After the initial test run with 10 businesses, I increased the limit to 50 for the next test.
Here are the results of Outscraper and Make.com Integration for our Lead Generation workflow.

Test, Fix, and Scale the Workflow
Once the data appears in Google Sheets, the main integration is already working. The next step is to check for small issues that can affect the quality of your lead list, such as phone number formatting, missing fields, or duplicate rows.
Do not scale the workflow right away. First, confirm that the test results are clean, each business appears on a separate row, and the columns match the data you expected. After that, you can increase the limit, test more search queries, and explore advanced options like webhooks or async requests later.
Protect Phone Numbers in Google Sheets
Before scaling the workflow, make sure your phone numbers are stored correctly in Google Sheets.
Phone numbers can break when a spreadsheet treats them as normal numbers. In some cases, Google Sheets may remove formatting, drop leading symbols, or convert long numbers into scientific notation.
To reduce this issue, format the phone number column as plain text.
In Google Sheets:
- Select the Phone Number column.
- Перейдіть до Format.
- Select Number.
- Choose Plain text.
If phone numbers are still changing after the column is formatted as plain text, you can add a single apostrophe before the mapped phone value in Make.com.
Once the rows appear correctly in Google Sheets, the basic Outscraper and Make.com integration is complete. You can now duplicate the scenario, change the search query, or increase the limit slowly after testing.
Quick Troubleshooting Notes
If the workflow does not behave as expected, check these common setup issues before changing the whole scenario.
| Issue | What to Check |
|---|---|
| API request fails | Check the endpoint and make sure the X-API-KEY header contains your Outscraper API key. |
| Iterator creates only one bundle | Select the inner array inside Data that contains the business records. |
| Field names look different | Choose fields based on the data they contain. For example, you may see address замість full_addressабо website замість site. |
| Phone numbers look broken | Format the Phone Number column in Google Sheets as Plain text. |
| Some cells are empty | Some businesses may not have a website, address, or phone number available. |
How to Scale the Workflow Safely
Once the basic workflow works, do not increase the volume too quickly. Start with small tests so you can check the results, fix mapping issues, and avoid creating messy rows in Google Sheets.
A simple scaling path looks like this:
| Stage | Suggested Limit | What to Check |
|---|---|---|
| First test | 10 | Confirm the HTTP request, Iterator, and Google Sheets mapping work. |
| Small batch | 25 | Check if rows still appear clean and complete. |
| Larger test | 50 | Review speed, empty fields, and duplicate records. |
Use specific local queries instead of one broad search.
Instead of:
restaurants in Florida
Use smaller searches like:
restaurants in Miami, FL, USrestaurants in Miami Beach, FL, USrestaurants in Coral Gables, FL, US
This keeps each run easier to review and helps you build cleaner lead lists.
Note About Webhooks
Outscraper supports webhooks as an API option for advanced workflows. A webhook can send a callback when a task or request is finished, and Outscraper also supports async request result retrieval for larger API jobs.
However, this beginner tutorial does not use webhooks as a second setup method.
For this workflow, the simplest path is still:
- HTTP module
- Iterator
- Google Sheets
Use webhooks later when you are ready to build a more advanced workflow with async requests, callback URLs, and result retrieval.
For advanced workflows, you can also learn how to verify Outscraper webhook requests before using callback-based automations.
Once the workflow is tested, your Outscraper and Make.com integration is ready to use. Start with one search query, check the lead quality, and scale only after your Google Sheet is receiving clean rows.
Send fresh business data from Outscraper into Google Sheets or your CRM with Make.com. Start with a simple workflow, then scale when your lead list is clean.
ПОШИРЕНІ ЗАПИТАННЯ
Найпоширеніші запитання та відповіді
To integrate Outscraper with Make.com, use Make.com’s HTTP module to call the Outscraper Google Maps Search API. Add your Outscraper API key through the X-API-KEY header, set your query parameters, then use an Iterator to separate the results into individual business records before sending them to Google Sheets.
Use direct exports for one-time lead lists. They are simpler when you only need to download and review data manually.
Use Make.com when you want automation. It lets you send Outscraper data into Google Sheets, CRMs, cold calling tools, cold email tools, or other apps without repeated downloading and uploading.
You need an Iterator because Outscraper can return several businesses in one API response. Google Sheets needs one business per row, so the Iterator separates the response into individual bundles. Each bundle can then be added to Google Sheets as a separate row.
For this beginner workflow, map only the fields needed for your lead list. Use name for Business Name, address або full_address for Address, website або site for Website, and phone for Phone Number. The exact labels may look different in Make.com, so choose the field based on the data it contains.
If the Iterator only creates one bundle, you probably selected the wrong array. Go back to the Iterator module and choose the inner array inside Data that contains the actual business records. If your test uses limit=10, the Iterator should create up to 10 bundles.
Phone numbers may look broken if Google Sheets treats them as regular numbers. This can cause long phone numbers to lose formatting, remove symbols, or appear in scientific notation.
To prevent this, format the Phone Number column as Plain text before running the workflow. In Google Sheets, select the phone number column, go to Format > Number > Plain text.
If the issue continues, add a single apostrophe before the mapped phone value in Make.com so Google Sheets treats it as text.